Wednesday, December 11, 2013

Cozy Christmas Decoration


My favorite holiday is Christmas. I love an excuse to decorate, bake and have quality time with family and friends—which are all essential to having a fulfilling and happy life if you ask me. That sentiment sort of goes along with this quote that I like to refer to often, and one I try to live by:

Life is a challenge - meet it!
 
Life is a dream -realize it!
 
Life is a game -play it!
 
Life is love -enjoy it!

Christmas makes me happy, and so does being creative and spending time with my boys. This time of year in Seattle, it is crisp and cold outside—and also so beautiful. I love to dress the boys up in hats, gloves and a warm coat and take walks or go to the beach and let them run around. I love even more the cherry cheeks they get from being in the cold. We just went down to our local beach and gathered some driftwood for Christmas decorations. We will put it back after Christmas because you are not supposed to take it (did you know that?!), but that just means we get another trip to the beach, which is great!

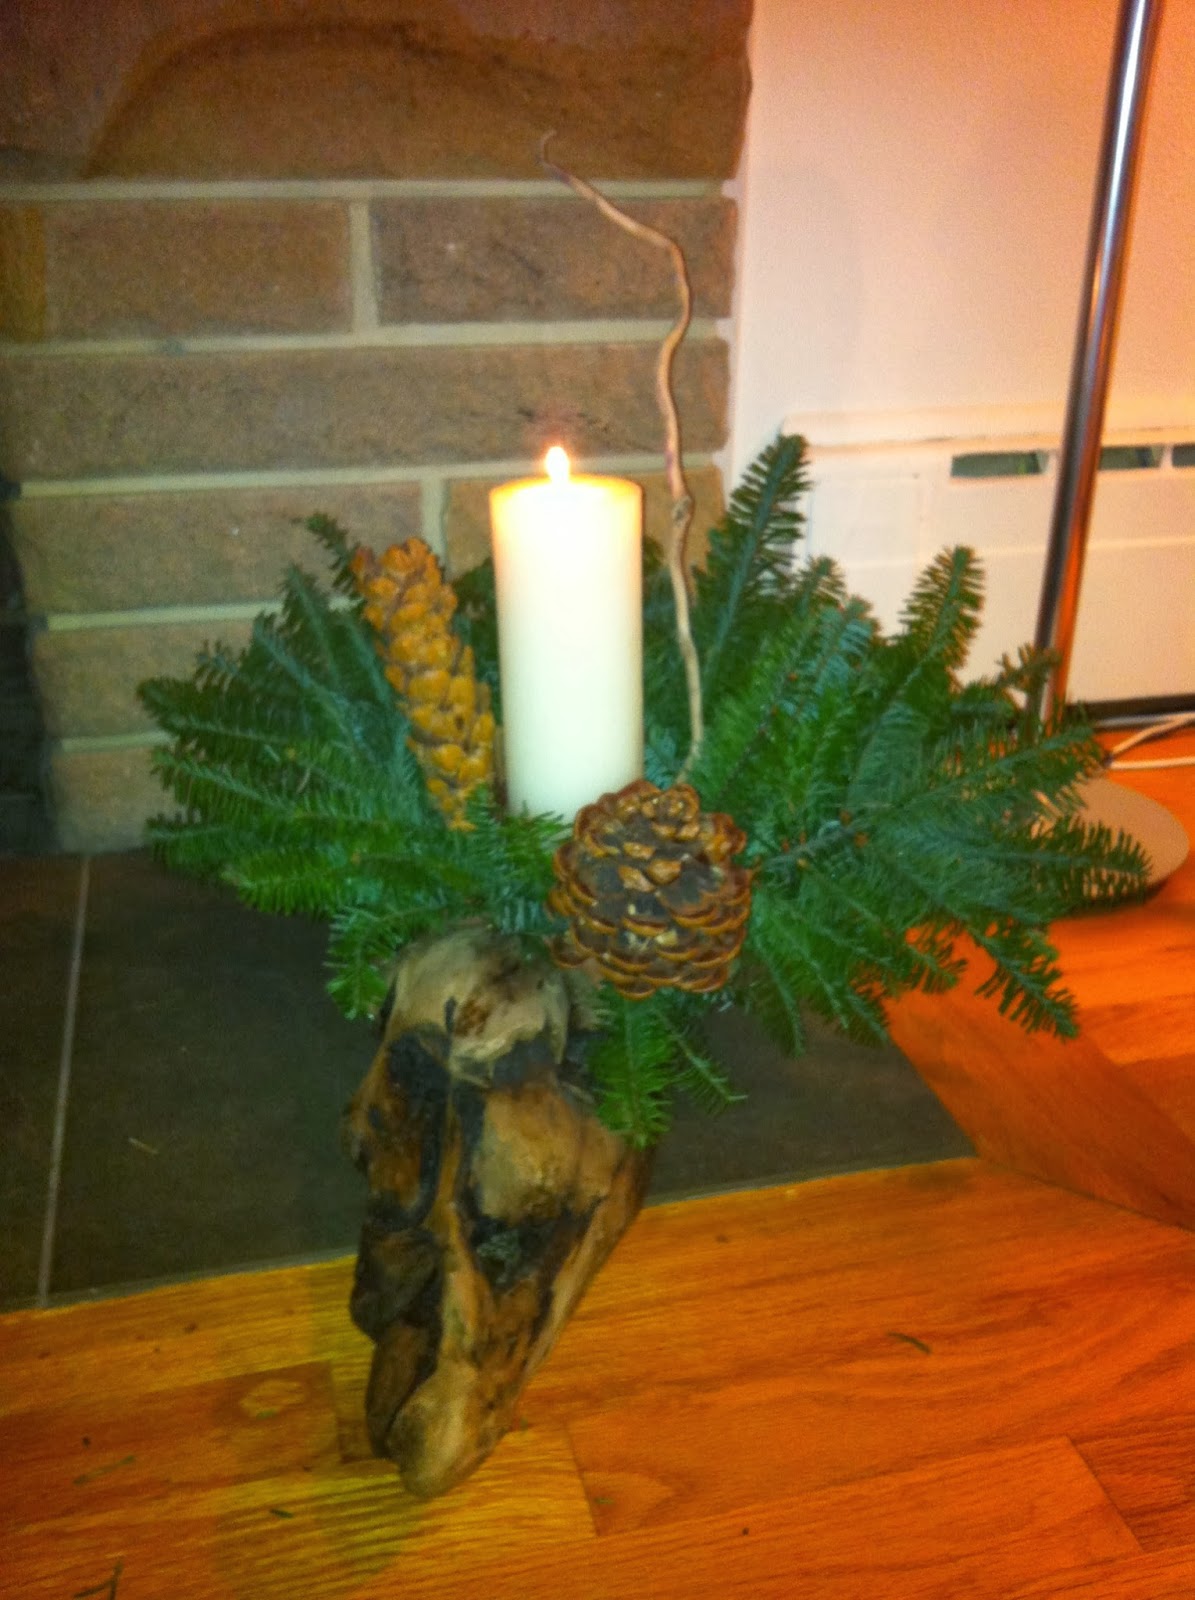
When we look for wood for decorative purposes, it is important that it can stand stable on the ground and that there is a flat surface on at least one side. Once you take it home be sure to let it dry for a day. In the meantime, go to a craft store and get some model clay, (the air-drying, less expensive type), and gather any other non-permanent items you think might compliment the color and texture of the driftwood. Some examples are dried roses, branches, leaves, cones. If you use branches, cut the branches in uneven lengths, then place a bunch of clay on the log and press it down so it sticks. Then, you can place a candle on top and build the decoration up from there. 
This is a fun task for both you AND the kids. It’s festive, it’s creative, and it’s a great way to make an inexpensive, homemade decoration that you can enjoy for the entire holiday season. If you don’t have wood then you can use a plate or a nice platter and some parchment paper to protect it and you can make your decoration on that.

Here are some examples for inspiration. I love how they fill up the room and make it all warm and cozy. You really just want to sit and enjoy it with some Christmas cookies and cocoa. Ideally, snow would also be falling outside and my sons cuddling next to me on the couch! Try out these decorations and send me pictures of them—I would love to see!

Wednesday, November 20, 2013

Road trips with kids are fun!

Thanksgiving is just around the corner (can you believe it?!), and maybe that means you have a road trip planned to visit some relatives or friends. My family and I love road trips, and we have taken plenty of them—so I have got a whole system down for how to have a successful road trip. Let me tell you, there is nothing worse than being stuck in a moving vehicle with anxious, tired and bored kids while driving at 60mph on a freeway in the middle of nowhere!

First and foremost, I have to have a lot of patience—that is key. Second, I bring plenty of non-sugary snacks and make sure we all get a solid meal before we go. Consider sugar to be your worst enemy when going into a car for a solid amount of time. When my kids were younger, I would run around with them at the rest area and that was great to get out some energy. I could even just tell them to run around a tree 10 times and they would. As they get older, I have to step it up a little since the tree suggestion is now usually met with a lot of eye rolling. During our last road trip I started a jump rope competition, since that is a skill both have not mastered yet. We went on a 2 week road trip (I know, sounds crazy), so we made a lot of stops and the competition continued at each stop. Each child had three tries and could mark the highest number as a score. The last day of the trip I had a little prize to give to the Jump Rope Master.  
Don’t forget to think outside the box when you’re on a road trip. Try to have other things to entertain the kids besides electronics, which are great in moderation. Audiobooks are nice cause then the kids will look out the window. Some nice games to bring are tic-tac-toe or card games. Or small crafts like bracelets, play dough or Legos are always great too. Don’t ask the kids if they want to do it instead of playing on their electronics—just start doing it yourself and they will join in. Ask them how to do something and they will get interested. Rock-paper-scissors and I spy are also great.

Use this opportunity as a time to bond with your family. You can learn more about your children and teach them things, or tell them stories about yourself or others close to you. Make the best of this time you have just sitting there with each other in a small space. Talk about the surroundings as you drive by. Here are a few good conversation starters:

·  Name some people who make you feel good just by being around them. (get to know the friends of your kids)

·  Name something cars do that buses don’t

·  What can you see from an airplane that you can't see from the ground?

·  Name some living things that don’t grow in soil

·  What could you find under the car seat?

·  How many things can you name that are the shape of a dollar bill?

·  Name five things you like about yourself

·  What colors do you see in the Spring? Autumn? Winter? Summer?


Drive safe and enjoy.


Wednesday, November 6, 2013

Fun for a rainy day

I love the colors of the trees and the fresh, cold air on my face in the Fall. Although I love this time of year, Summer so quickly turns to Fall here in the Northwest, and It can be challenging to go from staying outside all the time to being confined indoors. Once your reading is done, the board games get a little old and you have eaten all the homemade rolls, what else is there to do?
Well here are a couple of suggestions:
Make a ship and launch it.
Fold a paper ship, maybe even decorate it to get a little more creative! Wait for a break in the rain (if one ever comes) and go outside and in search of a big puddle, they shouldn’t be hard to find. Launch the ships and watch them float, or have a race with them. You can create your own wind by blowing on them if it’s not gusty enough outside for them to move on their own. If it is just too wet outside, the sink or a bathtub are also great places to try out your new creation.
 
Leafs can be fun too. They are more than just pretty colors in the Fall!
After you have thrown them in the air, jumped in them and covered yourself with them, gather different types of leaves. Once you’re back inside, make a little “Leaf Notebook” (you can even press them between the pages to flatten them out). Find a reference book or search leaves online to see if you can identify what type they are, then write down the names and draw the tree they belong to. Remember to make room in the notebook for fresh leaves you find when you come back in the spring/summer. You can also make collages with what you find and decorate your room. Or, tie string on the leaves and hang them from your windows. Maybe you’re having a party (or save them for Thanksgiving) and make nametags for the table with them.


That one thing you never use–use it!
Go in the kitchen and find that one machine or fancy utensil I bet you have stored away but never use.  Now is the time. Get the kids to help you. Pretend like you don’t know how to use it and have fun with it. Maybe they can give you some pointers. Maybe it’s a mini bread loaf pan. Those are so cute, but I never have a reason to make a mini loaf of bread—well, now is the time!
Use your imagination.
Throw all of your pillows and blankets on the floor and pretend like it the room is one big ocean with sea monsters that will catch you if you fall in. Climb and jump the room while you make up stories. This is so much fun for the parents too because you get to be a little silly. It’s like Dr. Seuss said: “I like nonsense, it wakes up the brain cells. Fantasy is a necessary ingredient in living.”
If you have any other fun fall games to play please share them here.

Wednesday, October 30, 2013

Kids want to help, if you show them how.


Now that everyone is settling back in the school routine, it might be time for some changes.

I find myself getting so caught up in my daily rhythm I don’t even think that there might be a smarter way of doing things. Not until I am so swamped I fall over in bed, sleeping before my head touches the pillow. Funny how taking one step back, looking at the grander scope of things, always tends to help.

The boys are now back in school and one thing that makes a huge difference is their help. As a mom, often you don’t realize the kids have many resources and actually want to help but don’t know how. Spend a week or two to teach them, and you are set for life. Teach them that clean socks do not just come down from the sky, and that joint effort in the home is the best and only way. Our biggest task as parents is to show our children all the different aspects of life, which includes folding laundry and emptying the dishwasher.

For me, I started with small tasks when the boys were 4 and 6 years old. Things like: take your dishes to the sink after dinner, put your shoes and jacket in the right place, and just clean up after yourself. Then it evolved to: empty the dishwasher, empty the garbage, clean the toilet and vacuum. As the tasks evolve, they get older, and the reward gets bigger. I started out small with letting the boys decide what we had for dinner on Saturday if they completed all their chores that week. We even made the meal together (and then they helped with the dishes afterwards, of course). With boys, I’ve noticed that it’s always a competition.  For them, it became a contest of who got the best score (who completes the most chores). When they got older, around 7 years old, I gave them allowance, but only if they finished their chores. I rated them on Sunday and if they did extra well on every task and got all green smileys, then they could spend the money. The trick is not to make it too easy. Be a fair judge—not a soft mom. Otherwise the system does not work. 

How are you making your kids help out?
 
Here is an example of what could be on your fridge next week;
 

Wednesday, October 23, 2013

Fun with Chestnuts


Chestnuts are for more than just roasting! Here is an awesome gift idea (maybe for Halloween) or just for fun anytime.

When you get a minute or two, go outside with your kids in search of a chestnut tree. Gather as many chestnuts as you can (be sure to bring something to carry them in)! These little gems make a nice fall decoration in your favorite bowl, or if you wish to do an activity with the kids, take a couple of toothpicks or matches, a small screwdriver or any object with a sharp point, and get creative.

You can really make them look like anything. Put toothpicks in one to connect it to another. Draw on them with sharpies or paint, decorate them with yarn or pipe cleaners—the sky is the limit. Try and crack them to see what is inside. You can even use the broken shells for decorations too. You can make different animals with them, like caterpillars or a cat or dog, or make a spider for someone special for Halloween. Check out my pictures for some ideas—my kids and I love doing this together!
 
How to make the spider web:

You will need; scissors, toothpicks, yarn, chestnut, paperclips, pointy object (screwdriver) and a nipper.
You take the chestnut and poke a small hole in the shell, that allows you to attach the toothpick. Now you can make what ever creature or shape you like. The spider on the picture is made with 8 toothpicks spread out. Attach yarn to the picks and circle it around each pick in the same direction each time. You leave a foot of string for it to hang in. When you change colors you make a knot on the backside with the color yarn you just did and continue till the toothpicks are covered with yarn. Shape the paper clips as legs and cut them into the right size with the nipper. Polk 6 small holes for the legs and attach the 6 paperclips legs. If you would like you can draw a face on it with some leftover paint or sharpies. A perfect gift for someone special.  


Sunday, October 13, 2013

Happy Halloween with a BOO.


I have to brag for a minute. We live in the greatest neighborhood! Everyone takes care of each other, and it is a nice mix of young and old, with plenty of kids for my children to play with. This morning we got up and there was a nice surprise by the door. WE GOT BOO’ed. This means some of our friends played ghost and got us a little bag with treats and left it by the door. It is a warm and fun-filled gesture that people do around Halloween. The best part of getting BOO’ed is that we don’t know who did it, so we just have to guess! 

How to BOO someone:
Check out the photos of what my door looked like. All you have to do is print out the instructions sheet and the picture of the ghost. Select two or more people you would like to “BOO” and make them a small bag with treats you know they will appreciate. The fun thing is you can make it simple and draw a cute picture, or even make bracelets to put in the bag. Or, you can just run to the store and get candy, healthy treats or Halloween-themed items. It’s all up to you! Place it in a bag with a copy of the instruction sheet inside and a copy of the ghost picture.

You then place the bag at the front door of the people you want to “BOO”. Make sure they don’t see you! You can even have the kids dress up in their costumes when you go and “BOO” so if your friends do see you, you are in disguise. When you are the one who got BOO’ed, place the picture of the ghost on your front door—this lets people know that you have already been BOO’ed, so others can have the opportunity to experience the same fun.

Please stay safe and have fun with it!

Print out the two images by right clicking on them and select "print target". Then start to BOO your friends!

Here is our treat:
This is what we got in the bag of treats from our friends or neighbor. I wonder who played a BOO on us? The boys and I keep guessing. . . 


Wednesday, September 4, 2013

Fresh Fruit popsicles that kids actually enjoy!


Here is a fun weekend activity.

The best fruits, in my opinion, are available during the summer. If you have fresh fruit on hand, I have the best way to use them! If you have some time go on a hunt for berries, or go to a local farm and pick your own. If not, go to the store and get mango, kiwi, strawberries, blackberries or any other type of nutritious fruit. Put them in a blender with fresh squeezed orange juice. If your child likes them, try adding some dates (and if they don't--they won't know :) ). This makes the most yummy and nutritious popsicles! Enjoy them right after they freeze, or save them for the winter when your child needs a little extra energy. You can even spoil them by adding some dark chocolate on the tip.  The way my boys love them is:

1 cup blueberries

1 cup strawberries

½ cup raspberries

1 ½ cup orange juice

½ bar of dark chocolate 70% cacao


Casper could not even wait to have a taste before I could take a picture--that’s how good they are.